Wednesday, August 31, 2011

Hello...hello...hello.........

My poor little neglected blog.  Moving and quitting my job really took the wind out of my sails!  I have been starting to sew again though.  Now it's time to get organized and motivated!


Ah, Affairs of the Heart... On top of my general inability to find enough time to sew lately, I've been torturing myself with indecision about that project and have finally come to a decision I can live with.

Since my blocks are meant for a quilt for my young daughter, I have been very concerned with how practical or durable the blocks are. I really hate the ones that I did on the machine, and I don't feel that the embroidery is especially durable either way. But since they are beautiful and I am stubborn, I have decided to do 9 of my favorite blocks by hand and make them into a wall hanging for my daughter. Then I'm going to take the rest of the pink and purple batiks I bought for that project and make a twin-sized variation of the Civil War Love Letters quilt. Since that one will be paper pieced on the machine it will be much more practical for a little girl, and it will still have a "love" theme. I'm going to make the heart center medallion variation. I'm going to do it on my own schedule and only do the blocks I want to do for my specific quilt. I think I might start a personal diary thread to post my pictures and progress so that I can get all the encouragement and feedback that this board offers without having to follow along on a BOM.

Anyway - that is the plan! If only I can get Penny Haren done.... Here are some pictures of the blocks I've completed recently.  I'm sure I've missed some, so I'll post a group shot soon.


Tuesday, April 5, 2011

I guess I just like things to take longer...

I made an executive decision last night.

While trying to machine stitch my second "Baby Love" quilt block I was increasingly frustrated because I couldn't get my machine applique to look nice.  Even using invisible thread and size 70 topstitching needles,  all I see is unsightly needle holes.  And I don't like the idea of all that monofilament holding my daughter's quilt together anyway.  I tried a satin stitch with matching threads, which I actually liked better - but not really.

So, even though this will be a quilt for a child, I'm going to do it by hand.  In my frustration, I started just sewing down my applique pieces by hand and it looked so much nicer!  And truly invisible!  I'm not going to do needle turn - I'm doing that on my tile quilt and that is enough of that.  I'm going to continue to use plastic templates and starch to prepare the applique pieces; I'm going to continue to use Elmer's school glue to paste them down on the background, but then I'm going to hand stitch.

So basically, I made two more practice blocks!  I'm going to have to do the first block over - even though the needle holes weren't as bad on it, and obviously I'm going to have to re-prepare block number two.

Whatever - I've got nothing better to do anyway.  We're only selling our house and moving in less than two months.  Oh, and don't forget the trip to Italy in May.  Yeah, nothing better to do.

I did sandwich Peter's dinosaur quilt last night.  The minky shed all over the place when I cut it but the cleaning people are coming today.  And, we got an offer on our house yesterday, so hopefully that will work out and clean minkyless floors won't matter so much anymore!

Sunday, April 3, 2011

I can barely see the dinosaurs for the trees!

I finished the quilt top for my baby's dinosaur quilt tonight.  It is a little busy, but I think he'll like it.  I took a dinosaur print and 5 brown batiks and turned it into a disappearing nine-patch toddler quilt.  I purposely did not fussy cut the dinosaurs and the end result looks kind of like you're watching dinosaurs run through the forest.

When I first started putting my colors together I wasn't too sure about how this would turn out - the nine-patches that I needed to make disappear were pretty ugly looking.  That fabric in the top center position is really horrifying on its own.  I bought it only because it tied in the orange from the dinosaurs.  Fortunately, my quilt top turned out like I imagined and wasn't the disaster it could easily have become! (Please excuse the poor quality camera phone pictures...)

My fabrics made some really ugly nine-patches!

I kept my pattern and color placement consistent and I think that helped keep it from becoming a big brown batik mess.  I like how the final top turned out and I think Peter will love pointing out all of the T. Rexes.


Mr. Muppy, our quilt inspector, approves.
I have some soft cocoa minky dot fleece to back the quilt with to make it extra snuggly for Peter. The minky fleece makes a horrible mess when you cut it though.  Since our house is on the market, I won't cut that and make my sandwich until Monday night though.    So why wait until Monday, you ask?  My husband, in his infinite wisdom, decided that our vacuum cleaner was dirty.  Did he wipe it down with a damp cloth?  No.  Did he empty the canister?  No.  He threw it away.  Our house is on the market and I have no vacuum cleaner. Our cleaning people don't come until Tuesday, so I cut the minky on Monday.


Saturday, April 2, 2011

Michael Squared

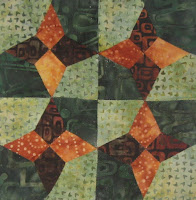
An awfully strange name for a block I think, but I finished Michael Squared last night.  MS is the block for next week in my Penny Haren Pieced Applique Sew-Along.  I also worked ahead and finished Kaleidoscope Star, the block that is "due" the week that we move.  I'm going to start doing two of these blocks a week so that when we travel and move later this Spring I won't fall behind the schedule.

When I first started putting Michael Squared together, I was horrified by my color choices and thought I would really hate the finished product.  But, I stuck to my color scheme and am pretty happy with how it turned out:

"Michael Squared"
I thought it was going to be an orange disaster, but everything seems to work together now.  My Kaleidoscope Star has a little bit more going on color-wise with the red.  Both blocks look nice along side the others I've already done.  I have to keep reminding myself that each of these little blocks is just a small part of the larger project and not a masterpiece unto itself!

Kaleidoscope Star
My next project will be to stitch down the applique pieces of Block #11 of the Baby Love quilt I'm working on in the Affairs of the Heart Sew-Along.  I've got them all cut out - I just need to finished ironing the edges under with starch and then stitch them down with my invisible thread.  I bought some smaller sized machine needles, which should make my stitching a little less obvious - smaller needle holes. I also want to make some significant progress on finishing my baby's dinosaur quilt.  My husband actually asked me about that one last night - and he never asks about any of my projects!


Thursday, March 24, 2011

Random Projects

I wanted to send my best friend from law school a little something to let her know I was thinking of her, so I put together a composition book cover for her.  I hope she likes it!  I made one for my niece in Italy for her birthday, and I think she liked it - I really want to make myself one - it is just never a priority.  Maybe I'll cover my day planner instead of a composition book. Anyway, here are some pictures of the one I made for Michelle, complete with a friendship star...


I also have a couple of quilts cut out and ready for piecing.  One is for my mother-in-law.  We are going to Italy in May, and will be there for her birthday, so I thought I'd whip up something to take to her.  Her quilt is an easy pattern - nine patches set on point and sashing with cornerstones - but is going to be made in really yummy batiks.  The other is for my 20-month old, Peter.  I recently made quilts for my 3-year old twins when they switched over to big kids beds.  Even though Peter will be in his crib for a while longer, I feel badly that I didn't make him one!  The theme for his quilt will be dinosaurs.  I'm going to use a simple disappearing nine-patch pattern and the quilt will be backed in a snuggly minky dot fleece.  I think he'll really like it.

Here are some pictures of the ones I did for the older two.  We have sharks and fairy ballerinas.  The twins still share a room, so I used the same pattern for both.  Originally I was going to do a bento box, but I couldn't bear to cut the sharks up any further, so this is what we ended up with!

Shark toddler bed quilt


Fairy ballerina toddler bed quilt


Baby Love!

Tonight, while watching my Gators win against BYU in the NCAA tournament (Go Gators!), I finished up the first block of Ginger's "Baby Love" Affairs of the Heart quilt. This is actually a different block than the one I posted earlier, although I used the same fabrics because I liked my color choices. The one I posted a few days ago used fusible web to attach the pieces. I ended up using that as a practice block to try some different satin stitch techniques, but I didn't really like any of them. I was very concerned about fraying since this is for a child though, so I redid the block with a different technique. I made plastic templates and used heavy starch to turn the edges of my applique pieces under. Then, I used clear monofilament and a narrow zig zag stitch to attach the pieces to the background. The blocks will be 12 inches, so I've enlarged the pattern to 175%.

The most time consuming part was the embroidery - it took forever! There is an awful lot of it on a 12" block. I did get faster by the end of the block though. The embroidery brought back wonderful memories of my Grammy teaching me to embroider when I was little - and all the cute mushroom garden pillows that we made together (hey - it was the '70s - and all the appliances were avocado - it was all very stylish!).

Baby Love - Block #9

A close up of some of the embroidery.

Because I'm a dork and I think it is kind of interesting - here is the back...
I'm really happy with how this block turned out.  If I can keep it up, this will be a lovely quilt.  

The official schedule for the group that is working through the book online doesn't start until June, but since we are moving in June I want to get a few blocks done now so that I don't fall behind before we start.   I may try to do 2 or 3 more in April.

Friday, March 18, 2011

Rising Star and Prosperity

I finished a few more Penny Haren applique blocks tonight.  I'm working a little bit ahead of the schedule that the group on the QB is using, but it's only because we're moving in June and I want to be ahead so I won't fall behind.

The first block is called "Rising Star" and I hate it.  My loathing shows. Typically these Penny Haren blocks require that you piece a small foundation block (I'm doing 6" blocks) and then glue your templates to your fabric for the applique and glue your applique pieces to the foundation.  Stitch, soak to remove the glue and templates and done.  I was really annoyed with this block - Piecing this block required that I complete the middle portion, applique and all, and then piece it into the outer portion.  I didn't like having to applique, soak out the templates and then finish sewing the foundation, stitch and soak again.   Most of the blocks would be too hard to do traditionally.  This one I could have totally done (and actually have done larger versions) using half-square triangles. And it is so plain looking.  I feel like I need to applique something else in the middle.  Not enough bang for my buck here.  I can tell I wasn't enjoying this one - my points are all crooked and I didn't care to do them over!  Not like me at all...

Rising Star - Bleh

The next block made me much happier.  I pieced the foundation, I prepared the applique, I stitched, soaked and voila!  I was done!  I think the block looks much nicer too.  This block is called "Prosperity."

Prosperity
Here are my first 8 blocks all together.  I like them!  I still dislike Rising Star immensely.  I need to remember that it is just one little 6" block in the larger group and I should just let it go...


Affairs of the Heart

Here is the last of my current long-term projects.  I just can't seem to resist a challenge!  A group on the QB is working through the book "Affairs of the Heart" starting in June.  I plan to join them!


The quilt in the book is made from 7" blocks and features a black background with batik needle-turn appliqued floral/heart motifs.  I've decided that I want to make this a bed quilt for my daughter for when she graduates from a toddler to a twin bed, so I've made some modifications.  Ginger's "Baby Love" quilt will be a bit different than the pattern in the book.  I've blown up all of the blocks to a 12" size and I'll be using a white background because I think that is a little more appropriate for a little girl (and our white cat who would be sure to gravitate toward any dark quilt!). I'll be changing the layout a bit since the quilt in the book is square and I need a twin bed sized rectangle.  Also, instead of needle-turn, I'll be doing machine applique to make the quilt more sturdy and washable.  The blocks also feature embroidery - fun and different!

I haven't sewn the shapes down yet, I've just used fusible web to stick them to the background, but here is my first block, just to give an idea of my colors and what the blocks look like.  This is block #9 in the book.

AOTH Block #9 - fused but not sewn or embroidered.  It's hard to see, but you can almost see the outline of where the embroidery swirls will go.  I have it lightly sketched in.  The swirls on the background will be done in green.  There are also swirls on the pink hearts and I will do those in either a lighter pink or a purple.  Still thinking on that.

I bought a bunch of dark green embroidery floss to make leafy tendrils out of my embroidery.  I like that except where is lays on top of an appliqued shape.  I may end up using various colors and not just green.  In the book the quilt has only gold embroidery.  Nice on a black background, but I thought that I needed more/deeper color on the white.

I ordered a bunch of thread from ConnectingThreads.com (my fave!) and as soon as I get all those colors in, I will start satin stitching these shapes down.  I have done some practicing - but my practice block is a bit of a debacle and not worth showing.  I was trying lots of things and wasn't using the right color thread.  I hope to have this block done soon since the QB group is starting in June and we are moving in June.  I want to have a couple-block head start so that ultimately I am not behind!

The Tile Quilt Project

I've already posted a bunch today, but I wanted to post a couple pictures of the cherry blossom block.  You can see the "grout lines" forming as I do the needle turn applique.  I just think that is so cool.  So, I'm a dork, or easily amused, or both.

Well, here it is - partially sewn down.

I've got the flower, one leaf and a little of the background sewn down.    I may redo the center so it isn't so lumpy.  Fortunately the petals are nice organic shapes, and my lumps aren't so noticeable there!

A close up of the grout lines taking shape...

Thursday, March 17, 2011

Row Robin 2011

I've joined a sweet and talented group of quilters from the QB to make a quilt - row robin style.  I've decided that my quilt will be mardi gras themed and will be a Christmas/late wedding gift for my step brother and his new bride.  He is in the army and they are currently stationed in New Orleans, so I thought the theme would be fun and appropriate.  I made my mardi gras themed row and sent it on to the next quilter in the group in February.  She has two months to make a row, add it to my quilt top, and send it on to the next person.  There are five of us in the group, so five rows in each person's quilt top.  Here is my first row to the mardi gras quilt:

I pieced spider web blocks and let them flow into appliqued "mardi gras beads."

A close up of the appliqued section.
In February, I also received someone else's first row.  Her theme is "Favorite Things" and each of the blocks in her row has some personal significance to her - a very sweet and pretty row.  I added to it by using some of my favorite batik fabrics in variations of friendship stars - I thought that would be appropriate for our group since our group name is "Making Friends Row by Row."  Here is "Favorite Things" with my friendship stars added on the left:

Favorite Things - two rows big.

My friendship star addition, by itself.
The next top I get to work on has a "Something Southwestern" theme - and I have lots of ideas involving coyotes and cacti!  I have about another month to wait until I get to work on that one though.  In the meantime - I'm dying to know what is going on with my row!  I got a few sneak peeks and it looked very exciting...

The Tile Quilt Project

I have become totally enchanted with a book entitled "Tile Quilt Revival."  I've been looking through the book and making plans in my head for months.  Finally, I put pencil to freezer paper and started working...


Basically, the technique is just to create a design out of applique and leave space between the applique pieces so that the overall effect is like mosaic tiles with grout lines between the individual pieces.  I don't know why I am so intrigued with this concept - but I am!  Absolutely obsessed in fact - and this will be the quilt that goes on *my* bed - so I want it to be super special and lovely.  I've decided to create various 12" blocks that mean something to me and my family.  I'm not using any of the patterns from the book, just the technique.  And the book has a great tutorial on doing needle-turn applique, which has been a wonderful resource.  

The first block I'm working on is a cherry blossom, to commemorate where my husband and I met and started our family.  I'm still working on the block, but here are a few pictures of the process.

I sketched out the design on freezer paper, ironed it to the front side of the fabrics (all batiks of course - I'm batik crazy) I wanted to use and then cut out and reassembled my design.  I'm using unbleached muslin for my background - and that is what will show through as the "grout lines."

A close-up of the pretty fabrics and not so pretty basting.

Here is the whole block - basted down.
I have started to applique my cherry blossom - I am doing all needle-turn applique by hand.  This is going to be my big piece of quilted art!  The needle-turn is going well so far, a little shaky but getting better as I go.  I am a little concerned about whether this is going to be sturdy enough to be a bed quilt.  I've been using a very fine silk applique thread, and may switch over to a more stout cotton.  I may also leave larger seam allowances for the next block.  If all goes as planned, I am going to quilt this as I go, by hand as well.  The only machine stitching will be to join the blocks together.  I fully expect this to take me a LONG time.

I'll post some photos of the needle-turn applique in progress soon.  I've been trying to do too many things at once and getting very little accomplished!

Sunday, March 13, 2011

Chain of Diamonds

I hate "springing forward."  At least maybe my kids will sleep late this morning since it is later than it should be!

The weekly schedule for the Penny Haren Pieced Applique group on the QB starts on Sundays, and since I already have my block for this week completed, here it is:


This block is called "chain of diamonds" and it is the 6th block in the book.  This block went together really easily for me, so this is either one of the easier patterns or I'm getting the hang of the technique - which basically involves stiff templates and glue sticks.  My glue stick ran out in the middle of this block, and instead of just going to find another, lazy-me tried to use Elmer's school glue.  Doesn't work the same at all.  Even though I use the Elmer's for basting and quilt construction all the time, it doesn't work for these blocks.  I had a hard time getting the Elmer's to stick and once it was down, it was super hard to reposition anything.  Forcing it resulted in a couple of shredded templates - but my self-imposed technical difficulties notwithstanding, this did go together very easily.

Saturday, March 12, 2011

More Boomerangs...

I wanted to share the beautiful boomerang swap blocks that I have received.  So far 24 of my babies have made their way back home to me and will be incorporated into quilts for my nieces.  My plan is to put a dark pink border on each to make 14" blocks and then sash them in white.  My nieces love pink, love anything girly and princessy, and evidently love the "shabby chic" look.  (I should mention that they are 3 and 5.)  These quilts will be perfect for them I hope.  I'm a little concerned about how I will quilt them since I need to make a full-sized quilt for each - but I'm not going to worry about that right now.

Here is the fabric that I sent out:


And here are the lovely blocks that I have received back so far.


Any problems you see with the blocks are most likely the fault of my bad photography skills.  The blocks are truly lovely and I am so pleased with each and every one of them!

Penny Haren's Pieced Applique

I've been working through this book with a very nice group of online pals from QuiltingBoard.com.


The technique that PH uses in her book basically involves stiff templates and lots of glue and I have found it easy to use and to get really precise applique.  These blocks are each 6 1/2".  My plan is to sash them, put a simple border around them and make a wall-hanging.  There are instructions in the book for putting them into a star setting and making them into 12" blocks for a bed quilt, but I really like my little blocks and think I want to look at them on the wall.

Here are the blocks that I have so far:


That first block isn't actually sewn down.  It originally had a red center, but I don't think the dark red center has enough contrast with the brown, so I'm doing it over.  Someone on the QB had the great idea to use the original block for a pillow so that it doesn't go to waste.  I think I'm going to do that. It will give me the chance to try the star setting from the book, which I wouldn't otherwise get to do.

We have a very well-thought out schedule for completing these blocks as a group.  I, however, am going to start working ahead of the schedule (Shhhh.... don't tell the ladies on the QB) since we are moving this summer and ultimately I don't want to fall behind.  Look for a flurry of cute little blocks soon!

Friday, March 11, 2011

Boomerang Swap

I wanted to make quilts for my nieces and nephew this Christmas, and I wanted to join a swap - because shouldn't all quilters join a swap at some point?  So, I joined a Boomerang swap on QuiltingBoard.com with the idea that I would use the blocks to make pink, girly quilts for my nieces.  I sent out 35 pieces of pink fabric with hearts and flowers, and am hoping to get back 35 perfectly princessy blocks.  I love what I've received so far and I'll post my received blocks later - they are still trickling in, but for now, here are the blocks that I made for others from the fabrics that they sent out - all 35 of them!  I learned a lot about scant 1/4 inch seams and half-square triangles...  I also gained a lot of confidence in my skills.  It was helpful to see that nobody produces "perfect" work.  Don't take that the wrong way - I am so happy with what I've received from others.  It's all been beautiful - just not "perfect."  Just like my own blocks weren't perfect.  Well, here they are.  My beautifully imperfect blocks.


Don't know why the rail fence blocks all look crooked.  I think that says more about my poor photography skills than it does about my sewing skills!

Hello...

I wanted somewhere to document and share my artsie-quilty projects, which my husband derisively calls my "little projects," so here I am.  I have recently been inspired by a book entitled "Tile Quilt Revival," and I have begun making a tile quilt of my own design.  I've also been working through several books with on-line friends at QuiltingBoard.com, and have participated in a couple of quilting swaps as well.  Everything will be here.  And if I'm the only one who ever looks at these pictures, well that's OK too.  I love looking at quilty pictures - even my own!